October 2015 | Ariel and Alder


Happy Halloween! 

The day is here, its a weekend, and if you are scrambling for a last minute costume I've got you covered with a quick DIY. I try to be something Pixar or Disney related for pretty much every costumed event and this year my boyfriend and I were short on time and whipped up these costumes inspired by the little green men from Toy Story. 

If you have an hour or less you can make a run to your local craft store and get the headband done in under 30 minutes. If you have a little more time on your hands, it will take about 5 hours (mostly dry time for the paint) to make the shirt. I will give you shortcuts throughout this post just in case your super pinched on time. 

Oh! and the total cost of the costumes was 12$ so this can be totally budget friendly depending on what you already have. All we had beforehand was the paint, hot glue gun, sharpies, a little fabric and the sewing machine.


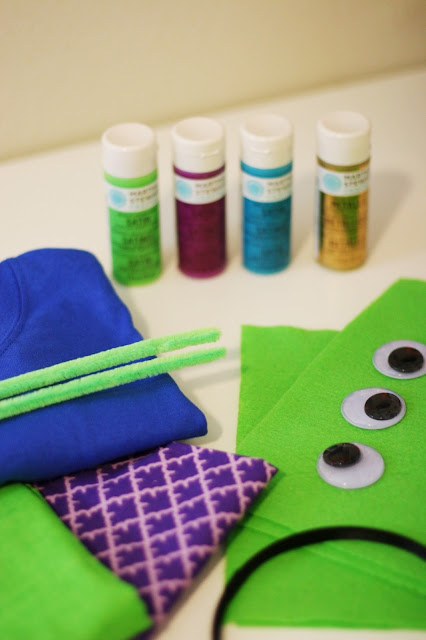
What you will need: 

For the headband:

For the shirt:
Royal blue tee shirt ($2.49 at Hobby Lobby)
1/8 yard purple fabric (I used scraps!)


I chose to sew the shirt collars first so I could let the green paint dry while we made the felt headbands. If you are just doing the headbands skip ahead. I found it easiest to cut the fabric into 1 1/2 strips and pin as I went along the edge of the shirt. Remove the sewing arm so that you can rotate the collar as you go along and pin accordingly. I did one stitch along the top of the garment and along the bottom to secure and make it look like an upright cartoon collar. 


Once your collar is done (pictured above) outline a circle on the left breast of the shirt in sharpie and paint it in green. Let the circle dry completely before doing anything else to the shirt. 


With the felt headbands here is what you need to do, it is super quick once you get the hang of gluing with the hot glue. 

1. cut green fabric into thin strips and wrap around the headband, stopping every third wrap around to place glue. 

2. Divide felt sheet in half (for the eyes) and then divide on of the new halves in half (for the ears and antenna).

3. Hot glue eyes in a line of three onto the piece of felt and cut around to create desired shape. Fold and glue the eye section around the headband. Add extra pipe cleaner onto the back for support. 

4. Cut out ear shapes (like a teardrop) and hot glue on to a pipe cleaner outline if desired. Glue the two ears onto the back of the eye section. Cut out circular shape for the top of the antenna, glue onto pipe cleaner and place. 

5. Boom! you are done with the headband!


Once your circle of paint has dried completely, use colored sharpies to replicate the pattern on the "pizza planet" logo. Shape, cut, and glue the orange pipe cleaner along the edge of the circle and repeat with the yellow Saturn ring.


And you are done! You have an absolutely adorable Pixar costume on your hands. 

Happy Halloween Friends! If you want to see the costumes in action you can check Instagram!

xo, 
Natalie



So we have already been over the fact that I'm a seasonal junkie, down to the details. I wear seasonal socks, drink seasonal tea, have seasonal candles....so why not go one step further and use seasonal lip balm. Im a little bit over the top, but I like to think of it as enthusiasm. 

Insert my latest obsession, Crazy Rumors. They offer a full array of seasonal flavors and because I can't choose, I've been carrying them all in my purse with "candy corn" on deck for halloween weekend. 

Need more info? Ive got you covered with the adorable rainbow graphic below!


Obsessed, is an understatement and I never felt more in the autumn spirit! 

Happy Halloween Eve!

This post was sponsored by Crazy Rumors. Thank you for supporting the brand partnerships that make The PDX Prepster a possibility!

xo, 
Natalie
Sharing some last minute costume ideas from a galaxy far far away today (hehe)!


R2 D2 Details: Dress/ Earrings/ Shoes


Darth Vader: Dress/ Earrings/ Shoes

 I find that leading up toward halloween I'm always in need of a few "throw together" costume ideas and last Saturday this R2-D2 one did the trick! Color is a great way to pull a costume from items that you already own or can borrow. 

Get 15% off all the jewelry pictured above with code: PDXPREPSTER15 at checkout

Happy Haunting!

xo, 
Natalie

This post was sponsored by Lisi Lerch. Thank you for supporting the brand partnerships that make The PDX Prepster a possibility!


I found the cutest little trinket tray in my mailbox this month and I have to say its one of the sweetest little decorations in my home. I received it as this months handmade item from a subscription box service called Fair Ivy. The box ships you one handmade item each month and from what I've seen (and received!) the items are all adorable. 

So so in love with this cute little tray!

Also, the earrings pictured are my two most worn in the month of October. I love them both! The navy studs have been great staples for multiple seasons and the cute little eye jackets are perfect for halloween week!

Happy "Hallo-week!"

xo, 
Natalie


Outfit Details: Mickey Shirt (thrifted, similar here)/ Long Sweater (on clearance!)/ Crystal Earrings/ Crossbody Bag/ Watch (c/o)/ Nail Color

Sharing some snaps of an outfit worn to visit my littlest nephew, Joey. As if I needed another excuse to wear Disney shirts, but just in case someone asks....I do it for the kids. 

My particular Mickey shirt was thrifted, but Forever 21 just launched a collection of super similar items

Happy Monday!

xo, 
Natalie


Trunks are awesome; they hold a ton and are useful in almost any home space. I acquired my trunk when I went off to boarding school, so of course I chose a color my middle school self would like: a dreadful "Barney the Dinosaur" purple. Out of convenience, I took the trunk to the dorms for storage and loved having it around. I could store anything I wanted to inside.  It wasn't until I moved into my first apartment that I began to hate looking at it. Gradually, it moved further and further into the back of the closet until it was out-of-sight-out-of-mind.

Fast forward two years later, I'm in a new place that I'm much more inspired by. Things are finding spots and things are remaining organized; all the pictures are hung and the drawers all have order to them. We needed a piece in our living room that we could use for storage of bulky items and that could have blankets stacked on top of it. 

"The trunk would be perfect!" I thought, "If only it wasn't such an ugly color.."

6 Nights, 5 bottles of paint, and 3 coats of Mod Podge later, the trunk is a very neutral navy and I love how it turned out.  Because I'm so proud of turning storage lemons in to lemonade, I thought I would share!


This picture was snapped in high school just as I was about to leave for the dorms, just now noticing how "PURPLE!" that particular shade looks.


What You Will Need:

-5-6 Bottles of Acrylic Paint (I used 59 ml bottles, the bigger the bottle the less you have to buy, I'm sure you could use other types of paint if you have extra lying around)
-Drippings Cup
-An Old/New/Used/Vintage/Thrifted Trunk. 


How To: 

Step One: Find a spot to paint in. You'll need somewhere that can allow for the trunk to dry in-between coats, so lay a scrap towel or newspaper down and pick which side of it you want to start with. Because of the shape of the trunk, you will need to paint and let coats completely dry before rotating to another side (it makes a mess otherwise, you have been warned).

Step Two: Once you have decided on where to start, begin painting the first coat of paint on one panel. Depending on what kind of trunk you have, you may need to tape your metal edges (mine were lifted enough that I could avoid taping them up).

Step Three: Paint the first coat and let completely dry. Paint the second coat and repeat. Rotate the trunk to a new face and paint it like before. Continue to do this until each face has a fresh, new color. 

Step Four: Mix Mod Podge in a cup (2 part matte, 1 part gloss) and repeat the above instructions until the entire trunk is covered in top coat. 

Step five: Let dry and wipe down. Boom! Color change!


Happy painting!

xo, 
Natalie


Is there anything better thank pumpkin patches and farms in the Fall, I think not. Since my college town is near so many farms I make the rounds to pick up gourds, pumpkins, and cider almost every weekend. One could say that its a produce addiction.

Gourds are good my friends! Whats your favorite seasonal activity? 

xo, 
Natalie


The Shopbop friends and family sale starts today and there are so many great neutral items to load up on! A classic watch, the perfect god cuff, a warm cashmere wrap...so much winter goodness!

Tread lightly before falling in love though, this sale has brand restrictions.

Happy Shopping! 

xo, 
Natalie


7be7ac4c244a74feda6d95cc86d319d9b8f1b2ce6db25f5437


Sharing a cozy/simple/easy autumn outfit to kick off this week! Monday requires something that can be thrown on in a matter of minutes and this combo fits right into that. Its finally cold enough to wear pants full time which means you wont be seeing dresses from me for a little while, I am a believer in the ultimate comfort of denim and layering.

Plaid is rad, and it goes with everything. This scarf was last worn here and has to be one of my all time favorite accessories for the season, along with this monogrammed tote bag. The deer print is faux (meaning no cute animals were harmed) and holds just enough for class or quick overnight trip. 

Have a wonderful Monday! 

xo, 
Natalie


Ever since this sweater arrived from one of my favorite discount sites I have found a reason to wear it at least once a day. Cold mornings, weekend errand runs, movie nights. This season I have been really attracted to oversized sweaters with bold geometric patterns and collected quite a few, but if I had to pick a favorite this one would be it. The brown makes it easy to wear with anything. 


Outfit Details: Sweater (on sale!)/ Birkenstocks/ Army Green Pants/ Striped Tunic (could only find the maternity version online, extra comfy i'm assuming!)/ Earrings/ Watch (c/o)/ Nail Color

Sweater weather indeed!

xo, 
Natalie

Next PostNewer Posts Previous PostOlder Posts Home